Click on any of the images to enlarge them.
For half of the 70's and all of the 80's I was a remodeling contractor in addition to being a general contractor. So not only did I provide top to bottom custom remodeling, ranging from a redo of a kitchen or bathroom to the gutting and rebuilding of older homes. But I also built many new homes from the ground up. One thing I would like to say though is that doing this yourself, especially if you are not qualified is really hard work. From doing this for a number of years, I would advice anyone who needs the services of plumbing repairs in the home is to look into finding a professional, who can provide you with the best results. As there are many services and companies out there, it may be best to look into something like yucaipa plumbing (if you live in and around the area of San Bernardino) to find your local plumbing company.
When siting a new home on a building lot, aside from the location of the well and/or septic system/leaching field if required, of primary importance is to place the house on high ground, or at least where water tends to move away from the home rather than towards. This is very important if you are planning on having a full basement, as anyone with a wet basement will tell you.
When we first looked at our new homestead I immediately realized the house had been placed on the side of a slope. The prior owner/builder told me he did this in order to have a full basement with a walkout portion in the back. The benefit of this is that the back basement wall and half of each side basement wall have plenty of half size windows all around, bringing in natural light year round.
Placing the house on the slope as he did can lead to wet basement problems unless you install curtain or footing drains completely around the outside of the concrete footing that the foundation walls sit on. It is better to drain away water before it hits the foundation wall and builds up pressure, forcing its way into the basement, than to try and seal the basement wall from inside. Move the water away from the foundation, either by natural flow or by a properly built drainage system.
I was pleased to see that not only had the prior owner installed footing drains, but he had also routed the down spouts from the roof gutters down into the footing drains, thus routing the water that would normally be dumped onto the front and sides of the building from the roof into the curtain/footing drainage system and away from the house. This is exactly how it is supposed to be done and the basement is water tight and dry. In fact it isn't even damp, with no need for a humidifier during the summer months.
During our second inspection visit to the home prior to our submission of a purchase contract, I looked for the curtain drain outlets that should have exited further down the slope away from the back of the house. I found one on the North East side and another smaller one that drained the basement floor itself if water was ever to enter the basement. But I could never find the drain from the South East side.
This wasn't alarming to me because sometimes a builder will use only one outlet. But the owner did tell me there were two outlets for the curtain drains and one for the basement floor drain. So there was definitely one outlet missing. I tramped around that damn East facing slope all summer long looking for that drain to no avail, even going so far as to cut all the brush back so that I wasn't missing it in the weeds. Nope... it was not there.
I put it out of my mind for the rest of the summer and fall, assuming that I would tackle it in the spring when it would show itself after the rains began. And it did, just not the way I expected.
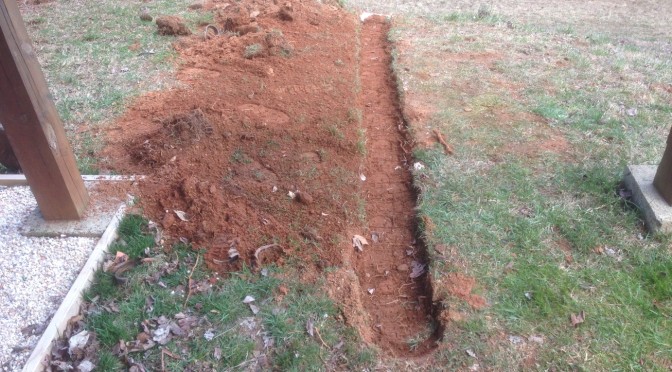
After some heavy rain for a few days I was under the rear deck once again looking for signs of that missing curtain drain outlet along the slope. And once again I saw nothing. Following the line of sight of the house edge I walked back up the slope and found a depression and small hole in the dirt about five feet from the house where nothing had been there last fall. The hole and depression was exactly where the drain pipe should have been if it was installed. Bingo!
 The image above was taken with my back to the house and the downspout looking away from the house and down the slope. Midway in the image on either side are posts supporting the deck above. There is a line shadow between those two support post and midway between them in the center is the depression and hole that I found. You can't see it clearly in the picture, but the depression, while not as severe, runs all the way out to where the slope drops off, about 20 feet from the house.
Time to get digging. I could see that there was the end of a 4 inch flexible plastic pipe in the hole. I assumed the pipe either broke or was disconnected from the other section leading to the slope drop off. I thought I'd have to call someone like sage water to come and fix it for me. A minute with the shovel proved me wrong. There was no more pipe. Time to hit the Loews 25 miles away, something we did several days later as part of a supply run to civilization. I took 5 more minutes with a pick axe and dug a crude trench to move the water away from the hole. No sense leaving the water to back up the pipe and clog it further up.
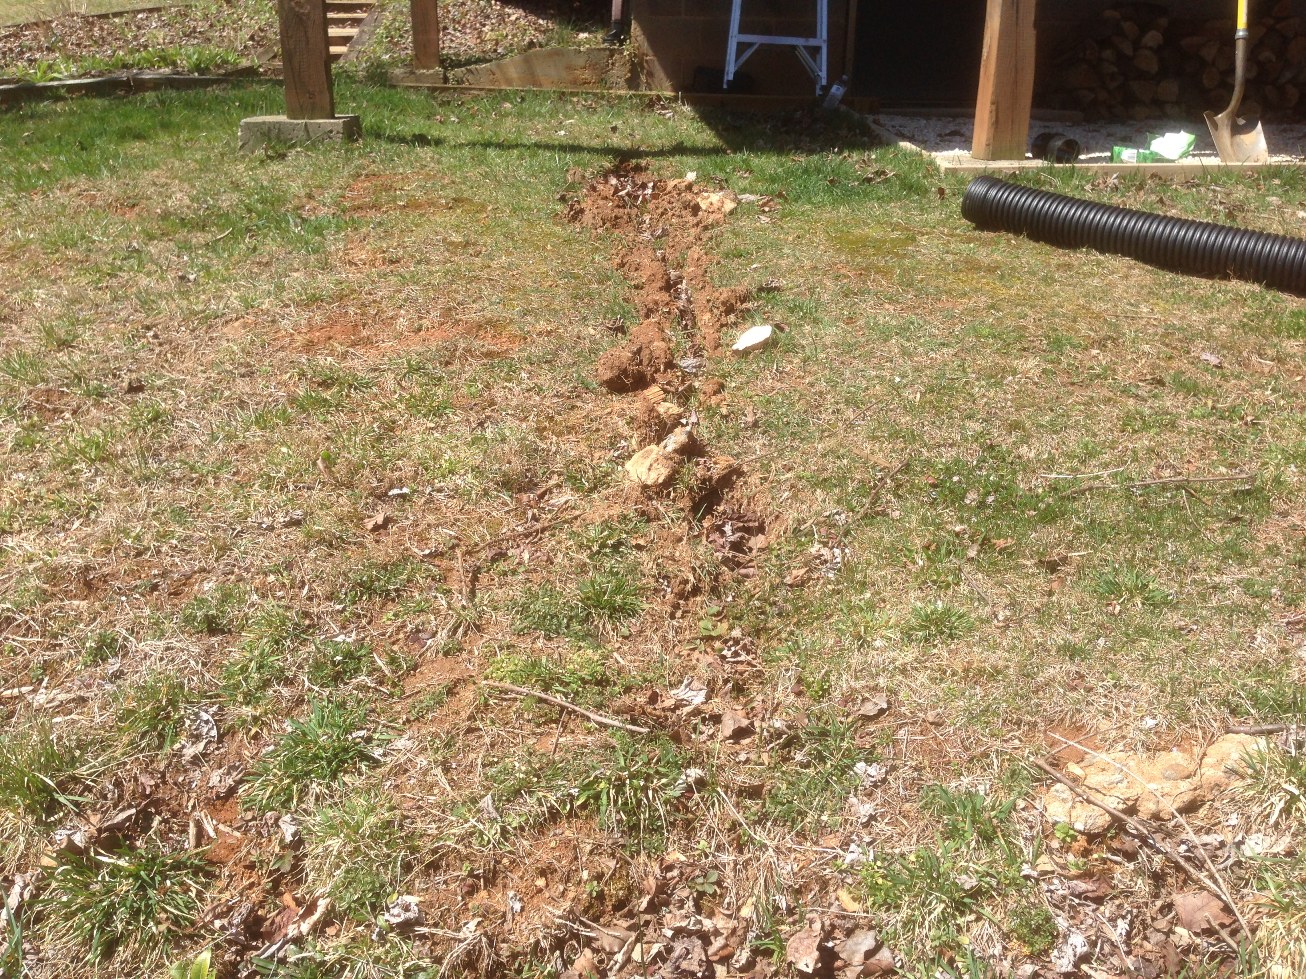
At Loews I purchased a ten foot section of 4 inch flexible plastic pipe and a connector. There was a stray 3 foot piece of pipe in the garage I could use with the connector to finish to run to the slope. This wasn't my first time digging in Virginia red clay, but I assumed it would be easier than the trench I dug for the generator because here I was digging through fill from the house construction. And while it was somewhat easier it was still a chore to dig. I am almost 60 years old so I don't have the strength or stamina I had 30 years ago, though my brain still thinks I'm 30.
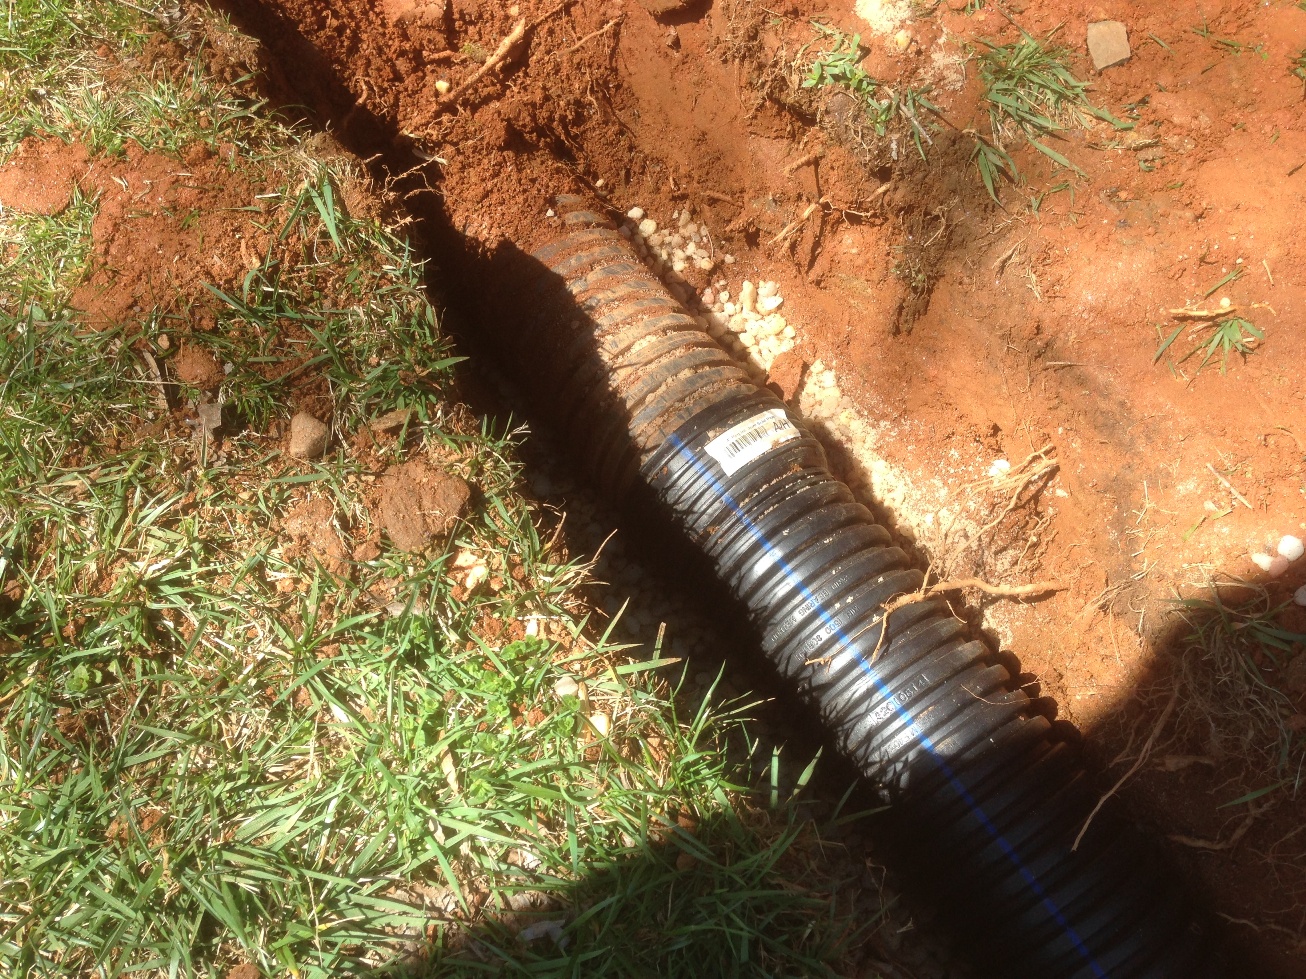
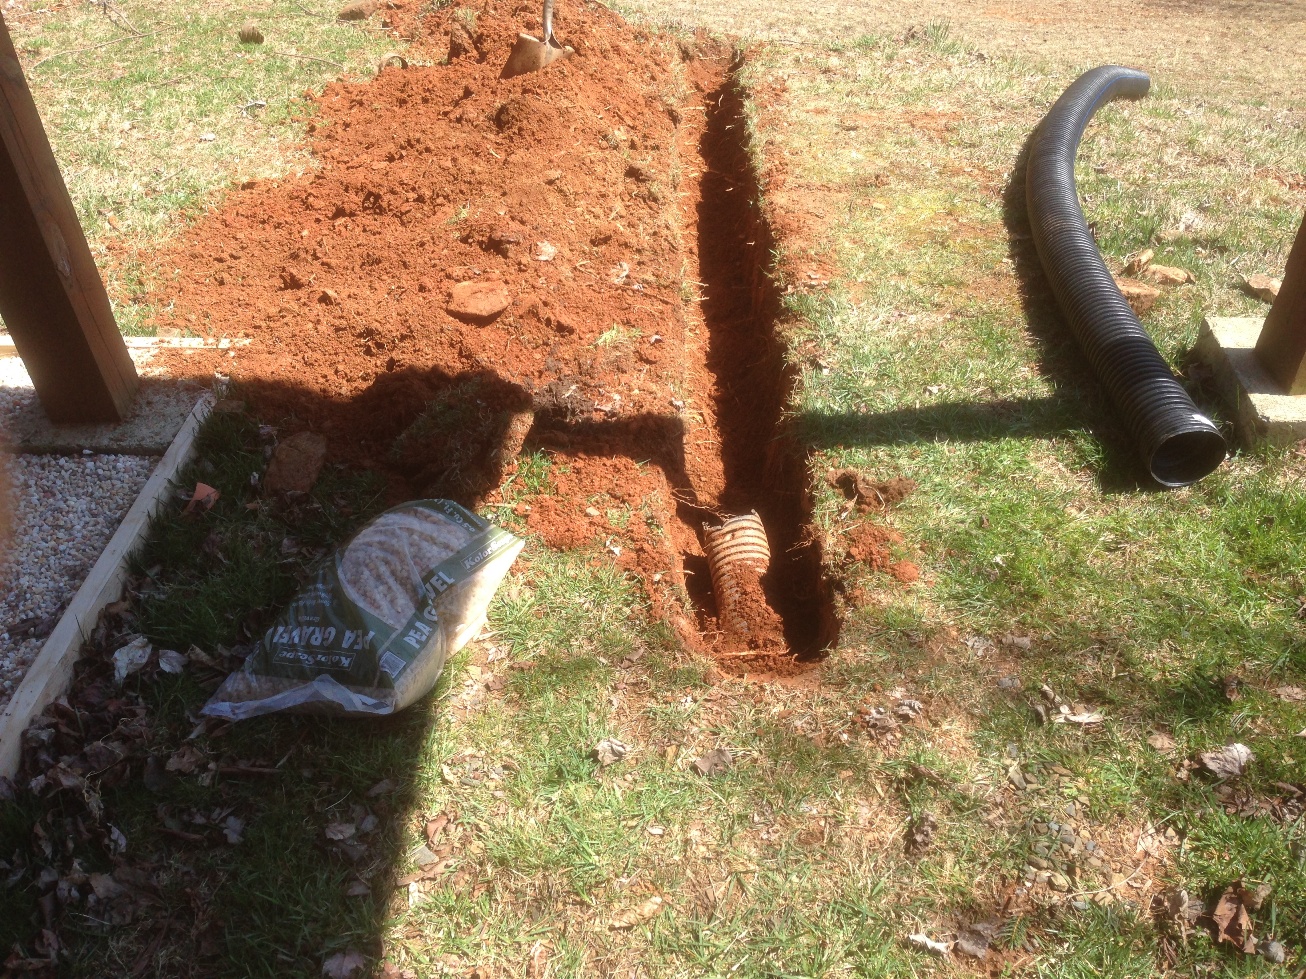 Above you can see the completed trench as well as where I had dug back a foot of the existing drain to free it up somewhat and to confirm that it was intact. I know it wasn't clogged because the last time it rained water flowed freely out of it. The new 10 foot section of flexible pipe is to the right. I used some tin snips to clean up the edge of the old pipe to make a good connection to the flared end of the new pipe.
The water in the pipe isn't under pressure so the seal doesn't have to be perfect. But why be sloppy when a few minutes of extra work ensures you aren't digging the pipe back up in a few years? If it is important enough to be done, it is important enough to be done right.
By the way, while digging out the trench I found no sign of the old pipe except for a few small broken pieces of 4 inch flexible pipe. I have no idea what happened here and will most likely never find out.
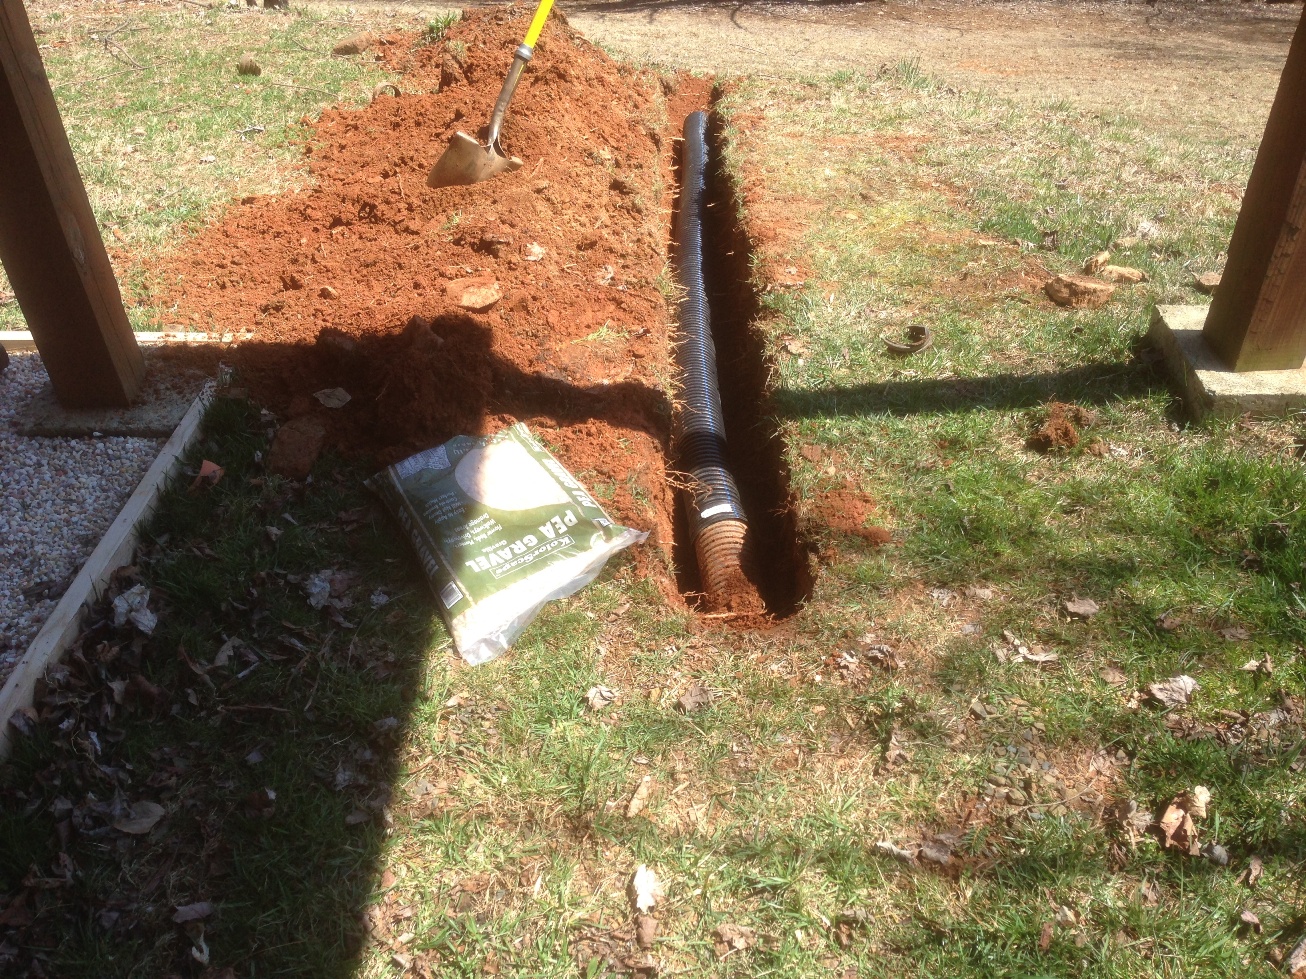 Above you can see the new pipe in the trench with the flared end connected to the old pipe. Not shown is the 3 foot section added on to the end. You'll see that in a bit. Also included is a bag of pea stone. I used several bags to surround the pipe in stone somewhat. I don't want water to build up around the pipe when the ground is soaked in the fall, then freezing and slowing lifting the pipe to the surface. Since the pipe is not below the frost line I needed to do something to prevent frost heaves and this was the best I could come up with.
 The image above shows the flared connection to the old pipe up close. It was a good thing I dug back a foot because the old pipe was sloping up quite a bit. I wonder if that pipe just dead ended there and went no further. If so, it would be the first sloppy job I have found that the prior owner did when building the house. Either way, by digging out the pipe and pushing the pipe back down to maintain a downward slope I had to dig another 6 inches from the bottom of the trench I just dug. More shovel work. Of course this was where all the rocks were buried. Oh my aching back. :) If you have a digging project ahead of you in Sydney and want to avoid the same discomfort, check out excavator hire in Sydney.
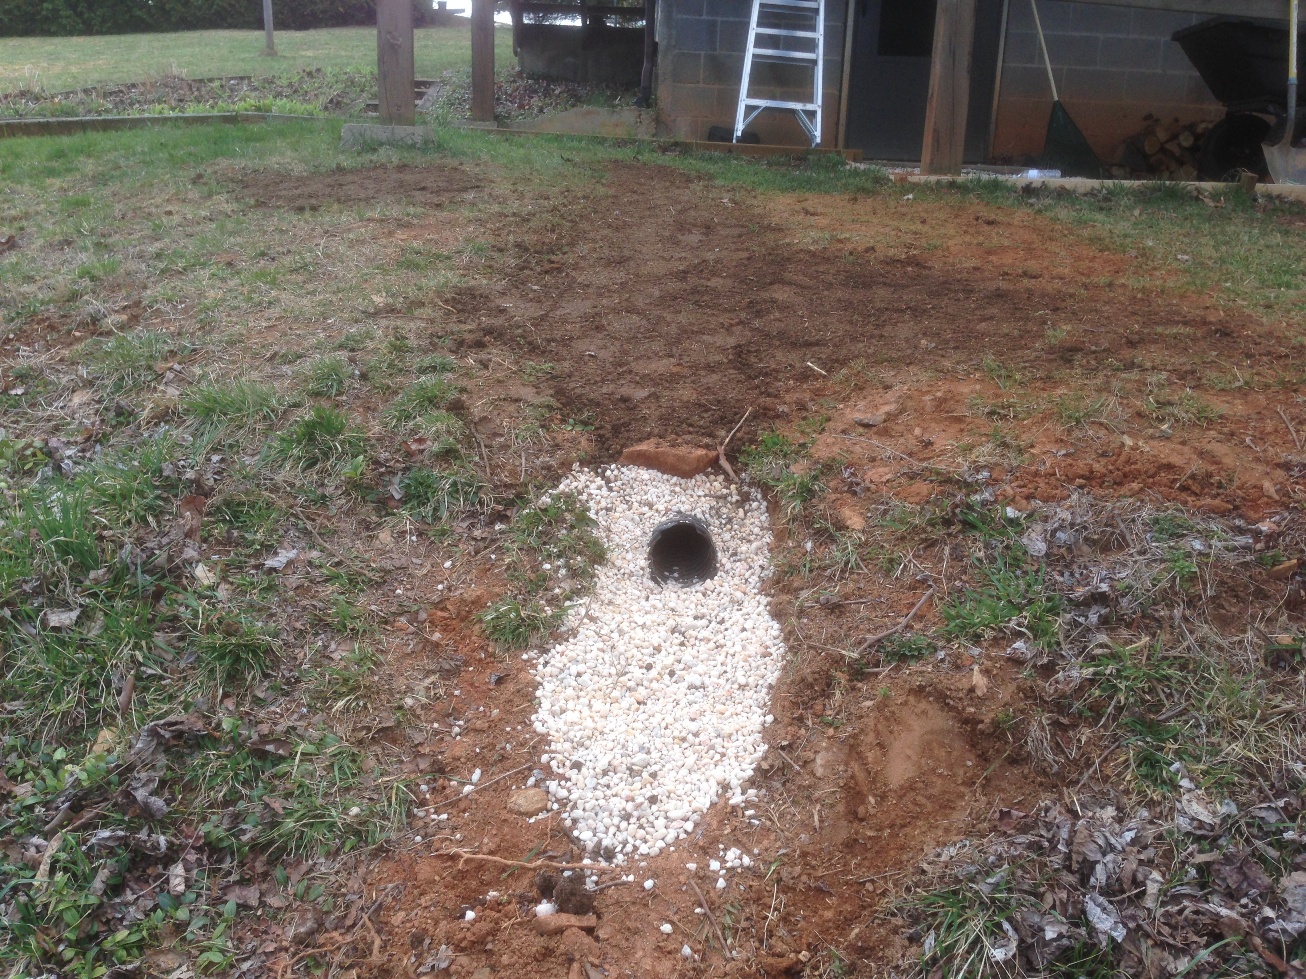
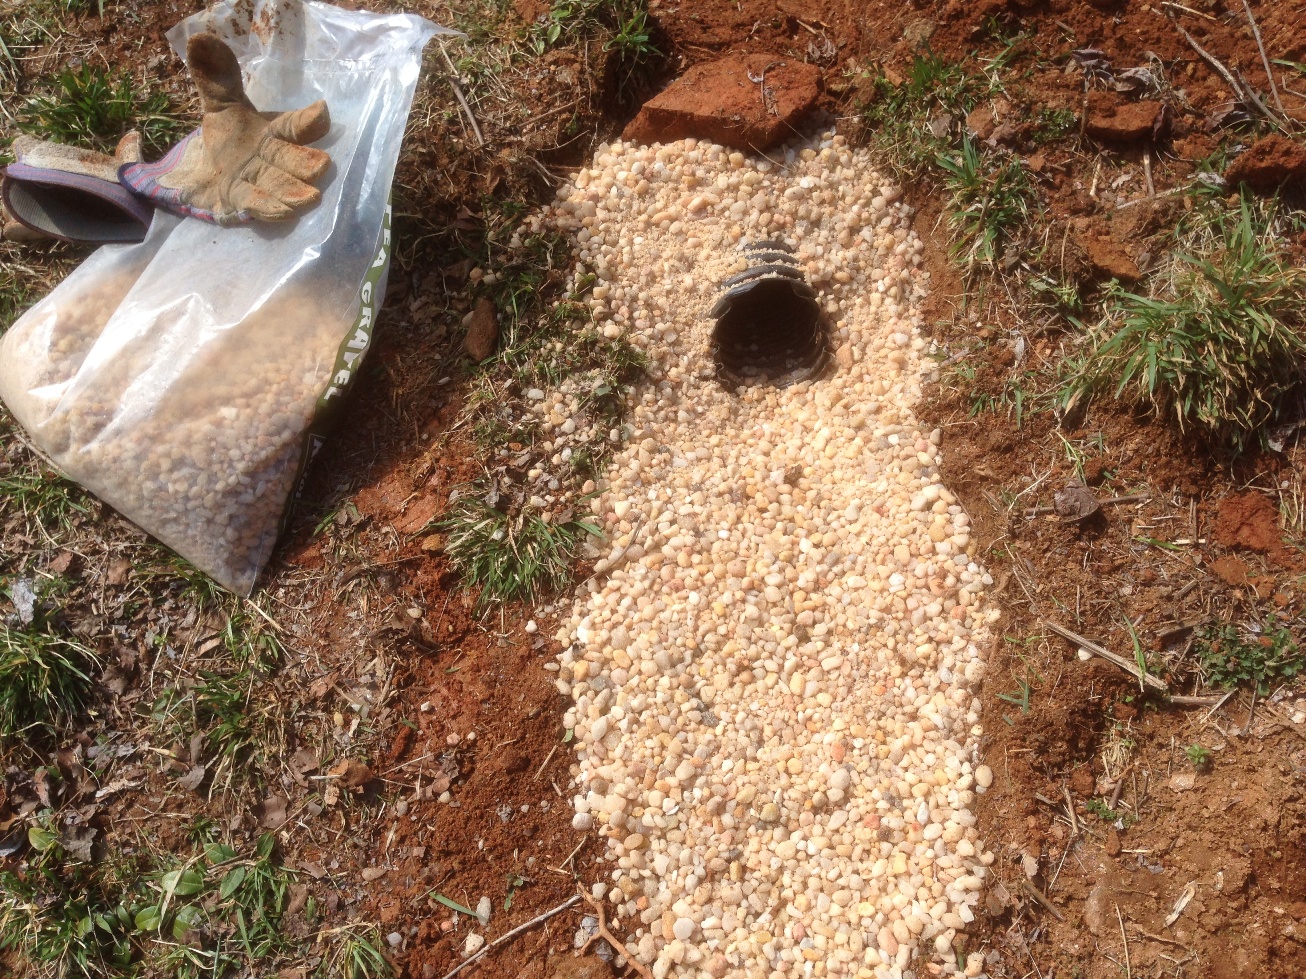 Here I have constructed a sort of rip rap area at the pipe outlet to dissipate the water into pea stone as it exits the pipe where the slope drops off. If I find the pea stone being dislodged by the force of the water I'll put some larger stone under the outlet to slow it down. For now it does what I want it to do and it looks pretty, the number one requirement of Mrs. Cog. :-)
 Another image just to show you the pipe surrounded with pea stone, then buried up to a few inches of the surface with the red clay 'dirt'. It packs real nice and the few times I have back filled a hole or trench, as long as I put down a few inches of red clay, the tamp it down with my feet, then more dirt followed by more tamping, there has never been any subsidence 6 months later. The one nice thing about red Virginia clay.
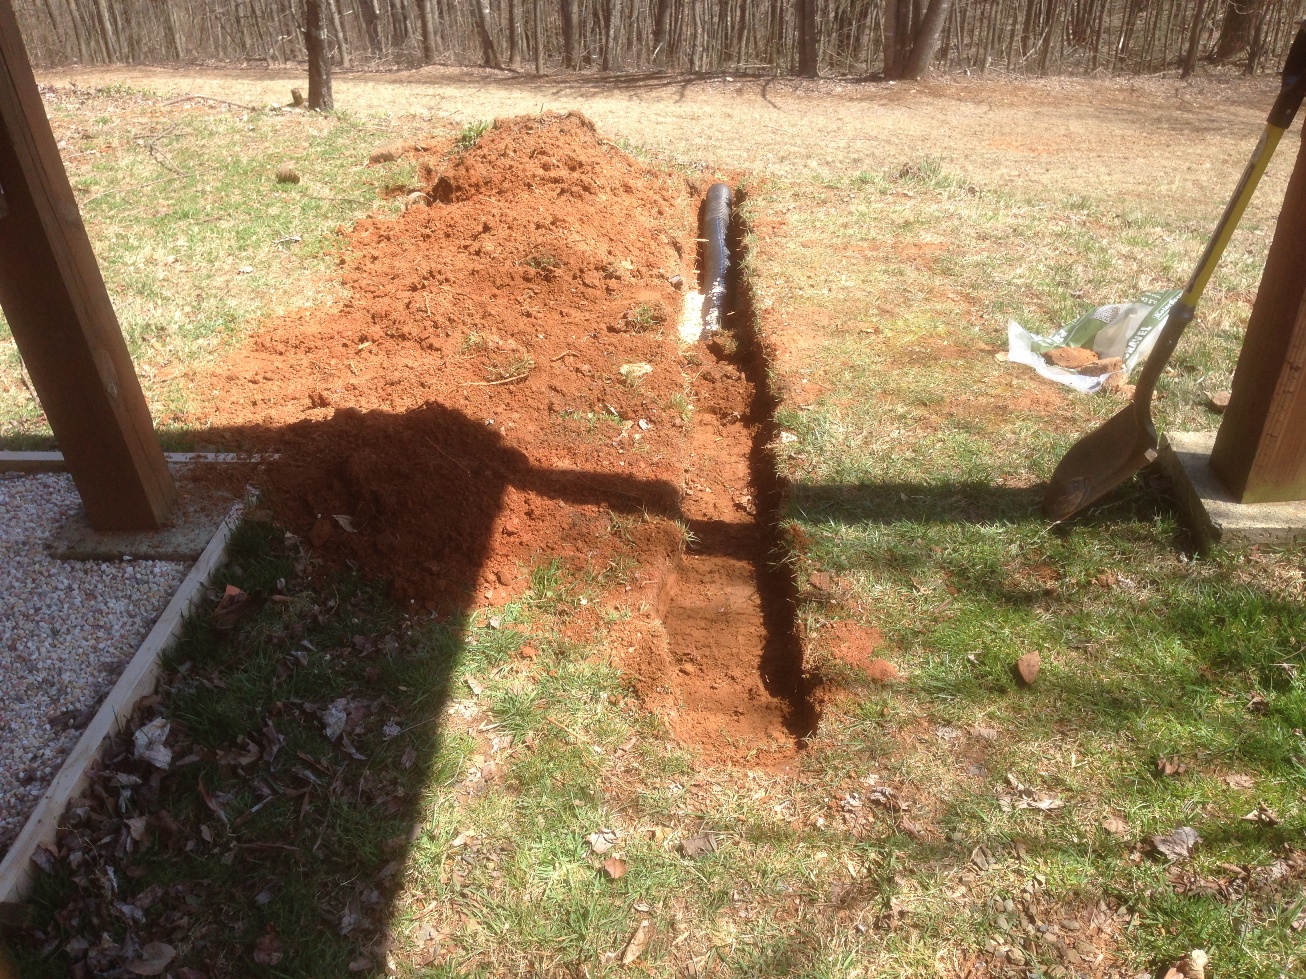
 I included the image above for two reasons. To show the trench filled in the last two or three inches with screened top soil and also to show the slope away from the house from a different angle. You can see how quickly it drops off. There is not much of a back yard to speak of before the mountain continues to fall away.
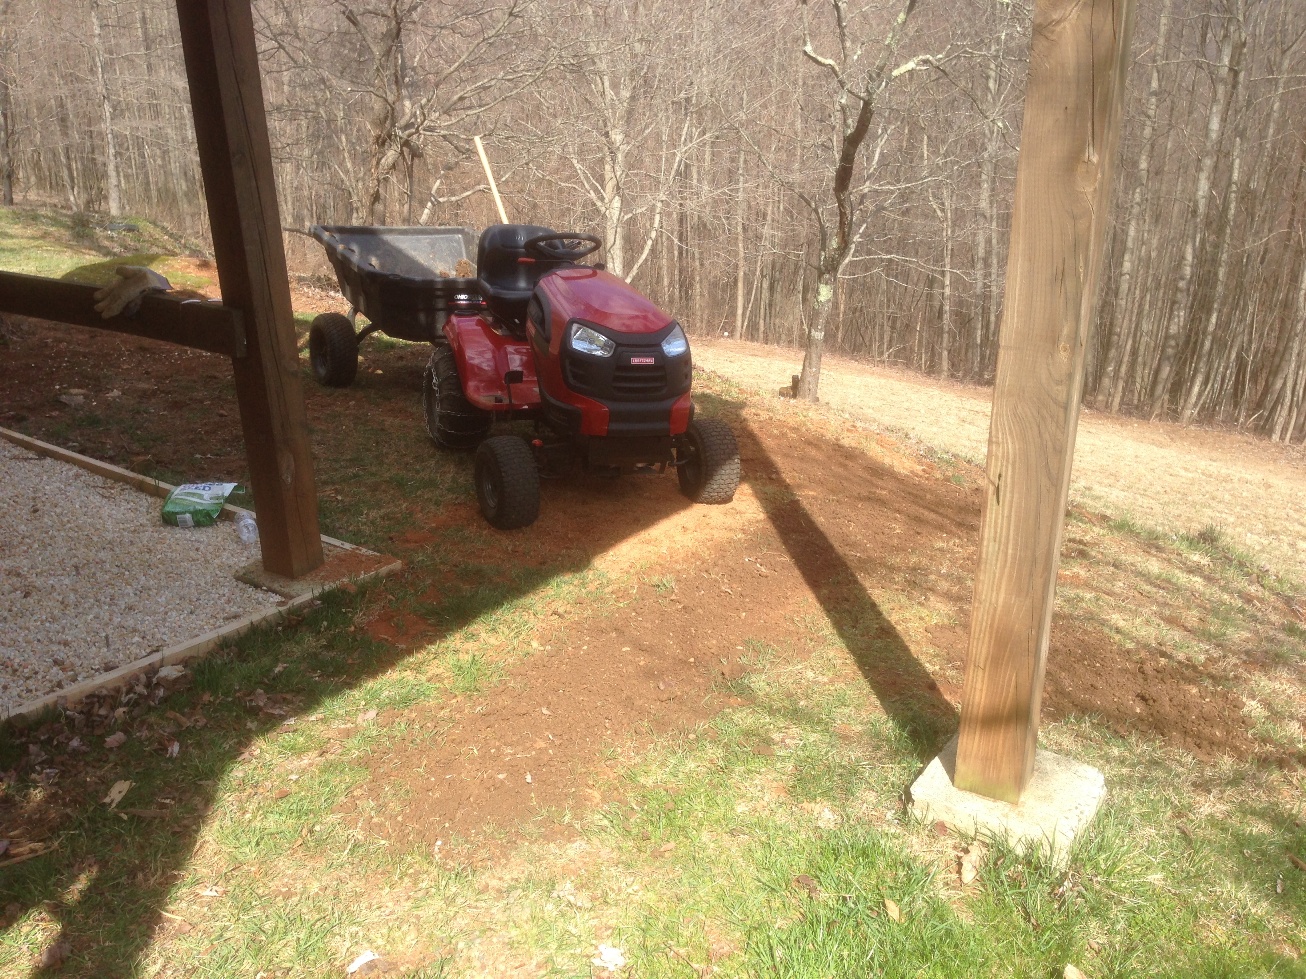
We had a large load of screened top soil delivered in order to make many repairs to the grounds, so the tractor and cart will be used repeatedly over the next few days to fill depressions and holes in the back yard. Then I will seed every filled area and cover with a erosion control straw mat because the spring rains are coming and I don't want the seed and soil to wash away.
 A final image taken from further down the slope looking back at the drain and the house. Looking straight up from the pea stone rip rap to the edge of the foundation wall, you can see the gutter downspout going into the ground. That connects to this repaired outlet as well as the one at the front of this side of the house.
I can't wait for it to rain so I can run outside and see the water flowing out of the outlet. I'm just a two year old at heart playing with mud pies. :)
Cognitive Dissonance
I was thinking of some of those long spike nails that tack roof gutters to the roof down thru the end of that drain pipe to discourage critters from getting in with nesting materials which might clog up on you. If that interests you, I would suggest pre-drilling the holes through the plastic to keep it from splitting or breaking.
And we have critters galore around here. I shall consider your idea when I next visit Lowe’s.
Cognitive Dissonance
After some more thot on those spikes, I might suggest slightly over sizing the holes you drill to allow for easy extraction if there does occur any build-up of leaves or debris behind them and to facilitate easy cleaning out by flushing.
Wrapping some hardware cloth around the end would be the way I would deal with it here…different critters in different places…
Mr. Gog
I see a potential Dutch bucket hydroponic system under that porch, Great sun, porch to keep the elements out of the solution reservoir(s). Chicken cage wire will work on the end of pipe secured with a stainless steel clamp.
Since that pipe is carrying the water from half the roof we can intercept it anywhere along its trip. Mrs. Cog and I have talked about this before and we actually purchased a rain barrel for water storage.
Cognitive Dissonance