Chapter One
By
Cognitive Dissonance
Regular readers may remember a humorous post from November of 2014 by Mrs. Cog titled ‘Amps Times Volts Equals Watts’. In that article Mrs. Cog relates with a giggle her struggle to understand the basic fundamentals of electricity, something she had previously given no more thought to for her entire life than where is the nearest outlet or light switch. I think I enjoyed that piece more than any other article by Mrs. Cog to date. If you haven’t read it, please take a moment and do so before proceeding. This article picks up (sadly sans most of the humor) where that one left off.
I wrote an article some time back describing the process of physically and financially decoupling from the Matrix. In it I described how we were selling assets to eliminate as much debt as possible in order to reduce the need for cash flow. While we are grateful some of our assets contained capital gains, we were not delighted with the idea the tax man would remove a sizable portion of ‘our’ money for ‘its’ despotic redistribution. Unfortunately the process of withdrawing often involves becoming more entangled, or at least still feeding the beast in many unexpected ways, even if this is temporary in nature and leads to less involvement in the system and a more sustainable lifestyle.
Needless to say the tax man’s wrath was felt in 2014, making us reluctantly resigned but very unhappy campers. Unfortunately, in a financial system which rewards those who continue to double down, the escapee who walks away is heavily penalized. Still, we were looking to repurpose some of the cash into tangible working assets of the sustainable homestead nature. If doing so happened to provide a tax credit, thereby reducing the tax man’s cut from a pound of Rump Roast to a twelve ounce Porterhouse, then all the better for us.
While we had always planned to install a more extensive photovoltaic (solar) electric system at some point down the road when money and time allowed, several stars aligned at the same time to propel this project back from the future and into the recent past. When we purchased our homestead, the prior owner had already installed two small fifteen watt solar panels and a tiny charge controller to keep two six volt lead acid batteries charged. These batteries were used to power a winch to lift heavy logs into the outdoor wood stove boiler. I expected I would eventually expand upon that existing system and repurpose it for household use.
Late last year in October of 2014 Mrs. Cog and I were discussing ‘What ifs’, an exercise we often engage in to see where we stand in our progress towards creating a more sustainable living environment and how far we have to go. A well known critical vulnerability was the lack of an easily accessible alternative source of potable water if the electrical grid failed and we eventually ran out of propane and gasoline used to fuel our backup generators which power the submersible pump in our well. While we have a robust creek on the property, accessing it requires a 200+ foot vertical descent down an old logging road to bring water back up, perfectly acceptable during an emergency but not a viable long term solution for this old fart.
A solution (notice I did not say ‘the solution’) was to provide an alternative renewable power source for the well pump, returning our thoughts once again to photovoltaic. Traditional submersible well pumps draw a relatively large amount of electrical current, especially initially in what is termed the ‘surge current’. After measuring a draw of 55 amps for two tenths of a second at 240 volts before settling down to less than 10 amps, it quickly dawned on me my planned ‘small’ photovoltaic system wasn’t going to cut the mustard. Time to Zig instead of Zag.
A second water ‘solution’, one we implemented at the same time as the photovoltaic to provide an extremely low tech backup to the well’s submersible pump, was a mechanical pumping system integrated into our home’s pressurized potable water supply system which can also be powered by a DC motor energized by solar power. The entire mechanical pumping system is installed in the same well casing as the existing submersible pump, pipe and electrical power line. I will be presenting an article on that system at some point in the future. Obviously the Achilles Heel to both ‘solutions’ is the single water supply, a drilled well that can go always bad. We still have the creek as a backup, though I need to give that problem a great deal more thought.
As Mrs. Cog learned, amps times volts equals watts. Since most photovoltaic systems are described in terms such as a 3 Kilowatt (KW) system, meaning a solar array capable of producing a maximum of 3,000 watts of electricity while the sun shines its strongest (not to be confused with an ability to draw 3,000 watts from the system for a full 24 hours, a much higher hurdle to overcome) I needed to determine how much surge wattage was required to start the pump. My calculator indicated 13,200 watts of power was needed for an instant and around 2,400 watts for as long as the well pump was pumping. Gulp! The 2,400 watts were certainly doable for a ‘reasonable’ amount of money, but being able to ‘surge’ 13,200 watts, even for less than a second, was an entirely different matter.
While I have a great deal of experience working with AC (Alternating Current) residential electrical systems, having extensively rewired the homestead and installed my own Generac 17KW propane standby generator with an automatic transfer switch and 16 circuit electrical panel, DC (Direct Current) systems, particularly photovoltaic electrical systems, are a different animal with its own electrical code, cabling, electrical components and specifications. It was pretty clear plenty of research was in order, so I hit the Internet and dove right in.
Many websites selling photovoltaic systems and components often have sections of their website devoted to educating the consumer on the ins and outs of the genre. If there is one piece of advice I can offer, it is to visit several vendors’ sites and study all they have to offer. Then visit solar websites devoted to your photovoltaic education without trying to sell you something at the same time. As helpful as I found the vender websites to be while researching, there is an inherent conflict of interest which isn’t always readily apparent at the time you’re doing your due diligence. Case in point; rarely do they suggest components or brands they do not sell, which for me was a real stumbling block when I began to research alternative inverters and charge controllers.
Every situation and installation is unique, so buying a cookie cutter solar ‘kit’ (assuming you will be installing it yourself) may work just fine in your situation…….or it might not. Because I had already wired our homestead with a separate standby generator electrical panel plus the homestead essentially uses two 200 amp service panels and a hodgepodge of sub panels, my situation was very unique and would require a custom design and installation even if I wasn’t trying to power the well.
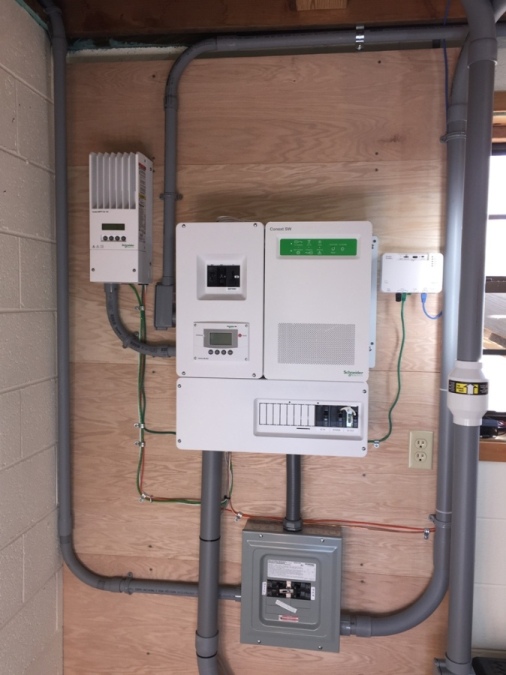
Charge Controller, Inverter, Transfer Switch, DC Switchgear, AC Switchgear, Control Panel, Communications Box, Battery Bank Exhaust Fan, Grounding, Conduit and Wiring.
My goal was to build a photovoltaic system that would not tie directly into the electrical grid, but rather be ‘off grid’. This ruled out a ‘grid-tie’ system, a photovoltaic system which basically remains connected to the grid whereby if the solar panels cannot supply all your needs, you draw the rest from the grid. If your solar panels are producing more electricity than you presently need, essentially you sell any excess power back to the power company in real time. Unfortunately, if the grid goes down when it is dark you have no power unless you also have a battery backup. I wanted to be able to cut off the grid completely if needed or desired and be self sufficient by supplying my basic electrical needs. Anyone who thinks power company electricity bills will remain ‘low’ indefinitely is just being naive.
However, I wanted to be able to integrate the photovoltaic system into portions of my house electrical system and be able to switch back and forth between the solar panels and the grid or generator as needed. I wanted this flexibility because several days of cloudy weather means the solar panels are barely generating electricity. This condition will exhaust the battery bank in a few days and require a return to an alternative power source for those household circuits wired to solar. The ability to do so with just a flick of a switch was important if Mrs. Cog was also going to operate the system.
I also wanted to be able to add additional house electrical circuits to be energized by solar power as I expanded the system capacity at various points in the future. In addition I wanted to be able to charge the battery bank either by the solar panels, the electrical grid, the whole house standby generator or any reasonably sized portable generator. Finally I wanted the ability to expand the system by a factor of three or four and add a wind turbine or two at some point to take advantage of the near year round winds up here on the edge of the Blue Ridge Plateau. It was a tall order to fill and as previously stated money was limited.
Because this article series will delve into greater detail in later chapters I don’t wish to get lost in minutia for this piece. Suffice to say there is a large and growing selection of photovoltaic components on the market, a major improvement over just a few years ago when I last looked. But……if you buy just what you need now and you wish to expand the system in the future, you will waste a lot of money if you are forced to replace components later which have exceeded their capacity or capability. While going cheap may solve an immediate need or desire, after living with the system for a short time buyer’s remorse often sets in. There is nothing worse than dumping several thousands of dollars into a system only to realize you are stuck with something that doesn’t fit your needs or can be properly expanded.
This is why the very first thing to be done is to identify how big a system you wish to create and not how much you can afford. After you use an online calculator to find out how big of a system you want, (for example here is just one of many calculators found on the web) the shock of discovering the cost of your wants will quickly help you pare them down to basic needs. In order to truly comprehend the difference between your needs and your wants you must go through this exercise. It is a rare individual indeed who truly understands how much energy they use on a daily/weekly/monthly basis when all they see is the electric bill each month.
If you are serious about building a photovoltaic system I guarantee that after doing some research you will suddenly be looking for electricity usage labels on your TV’s, refrigerators, freezers, computers, monitors, toasters, blenders and so on. We tend to be much more aware of power usage when we are generating our own power. Suddenly compact florescent and LED lighting look much more attractive even with their high cost. Speaking of cost, for only $30 a ‘Kill A Watt’ Meter or similar device is real handy for measuring electricity use, either instantly or over time, of any plug in appliance, computer, light, radio, clock etc. It is well worth the expenditure just to know where you ‘waste’ electricity even if you never purchase a photovoltaic system. Google ‘electricity vampires’ for a quick education.
Mrs. Cog and I could not afford to purchase all that we wanted now, but we knew we would eventually do so. Designing the entire photovoltaic system to fit only what we could afford now would severely limit what we could do in the future. For example, if I eventually wanted to power half the entire house via photovoltaic year round (something I expect to eventually do) but could only afford a system that would power 10-15% of the house now, many of the components I purchase now might not be able to be expanded later unless I carefully planned to do so before purchasing. Planning ahead meant I would need to buy certain components which are bigger than what I need now, but are just right for later.
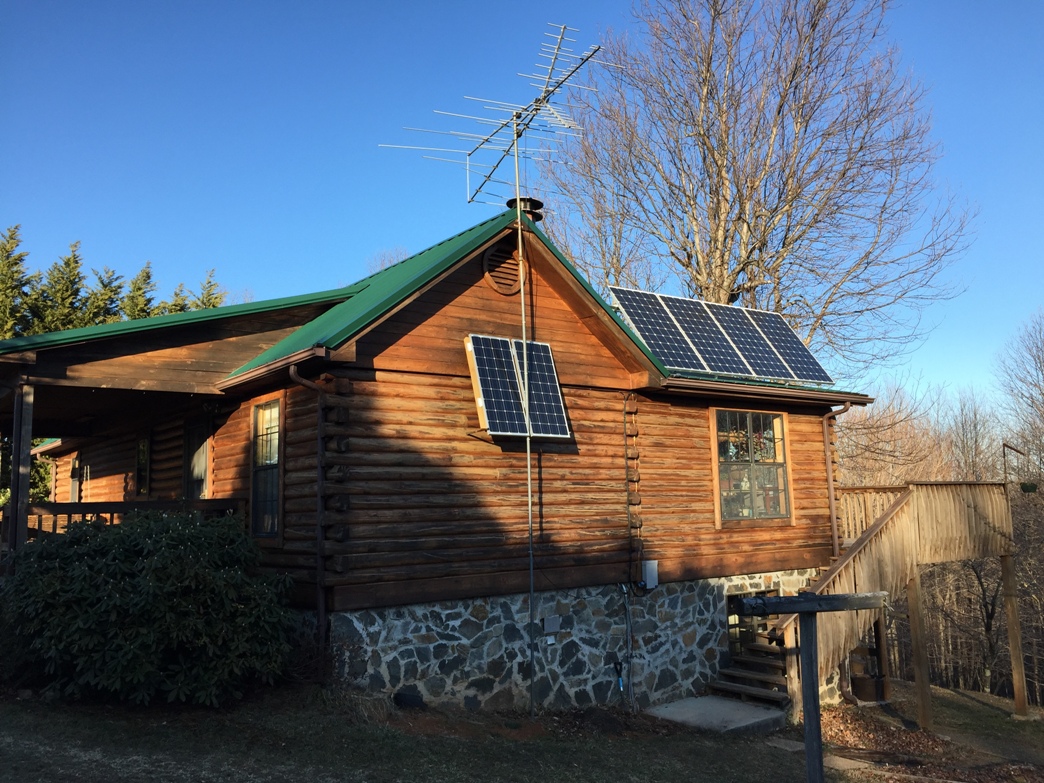
Unless you are buying very small solar panels (less than 100 watts each) your existing solar array can usually be expanded in the future, though you will likely need to rewire them into a different configuration. We began with ‘just’ four 265 watt solar panels in our solar panel array for a total of more than 1000 watts of production during maximum sun. But we also planned for significant expansion in the immediate future, so other intermediate components were sized (and priced) accordingly.
Your battery bank (a grouping of similar batteries) is another matter to carefully consider. A 12 volt DC battery bank, usually employed strictly with small systems, is very hard to expand into a 24 or 48 volt bank, especially if done much later and with dissimilar batteries and manufacturers, a no-no in any professional designer or installer’s book. You can create more than one battery bank, but this complicates matters significantly and doesn’t solve the problem of dissimilar battery bank voltages. Again, if you plan to expand in the near future this must be taken into consideration now.
We walked the middle ground and created a 24 volt battery bank using eight 6 volt flooded lead acid deep cycle batteries, with plans to add an additional four more of the exact same batteries within the year. A general rule of thumb is you will spend as much on your battery bank as you will on your solar panels. Take a look at these pre-configured battery banks with cables included, which are priced anywhere from $1,000 to $8,000. I have even seen preconfigured battery banks selling for more than $20,000.
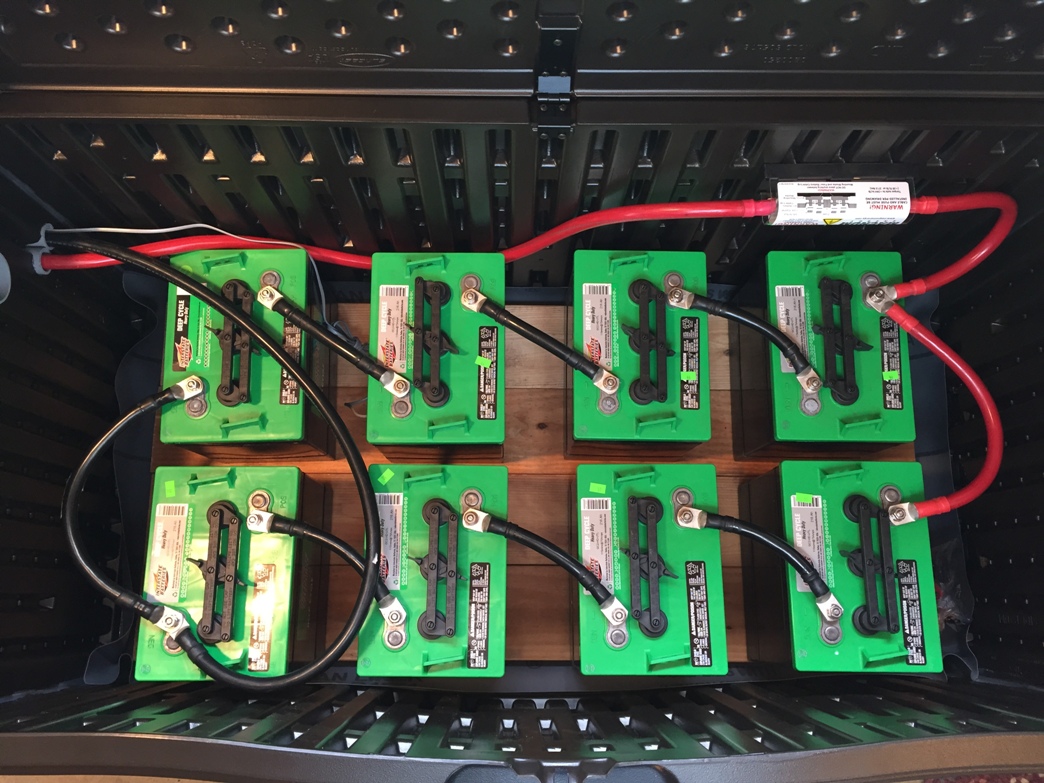 Our 24 Volt battery bank inside a deck box in the basement.
If you plan on expanding your battery bank, pay particular attention to the connecting cables. If you select battery cables initially which are too small for future expansion just to save some money now, you will regret it. I bit the bullet and went with the largest 4/0 gauge high quality battery and inverter cables upfront. Surprisingly this was a significant expense, amounting to well over $400 just for the battery cables. But I will never need to replace them with larger cables and with proper care and maintenance will last for the rest of our lifetime.
From my point of view the most important aspect of planning a flexible photovoltaic system is selecting the proper control, switching, charging and inverting equipment, the heart of the system if you will and located between the solar panels and the battery bank. Money properly spent here will not doom much of the system to obsolescence the first time you wish to expand.
Of primary importance is selecting equipment that can be easily expanded (‘stacked’ is a term often used) and which was designed to do so directly from the factory. Jury rigging dissimilar equipment together exponentially increases the chance of a system break down under stress, precisely when you need the system the most and are least able to repair or replace.
The downside to greatly increased component selection to choose from is the proliferation of cheap junk disguised as inexpensive alternatives. After pricing high quality pure sine wave DC to AC inverters (3 – 4KW) in the $2,000 - $3,000 plus range, the temptation is nearly irresistible to snap up an inferior alternative claiming the same specifications for less than half the price. Let the buyer beware, however, because not all electrical components are created equal.
While I have no desire to name names since I have no firsthand experience or knowledge, there are plenty of people out there who have been burned and are more than willing to share their experiences. Take the time when conducting your due diligence to be thorough in your investigation. This will require you to learn some of the electrical concepts and technical jargon of the industry. Do not be penny wise and pound foolish.
That said, there is a distinct bias in the upper reaches of the photovoltaic industry against ‘Chinese junk’ which is not always warranted. Several of the top name brands are supposedly American made, thereby inflaming the belief foreign manufactured components equates to poor quality. This is misleading since one cannot competently and fairly compare two components located on either side of the price spectrum. Quality electrical components are expensive. Lower quality is less expensive.
In addition, electrical and electronic devises originating from China are not all bad since many of the ‘American made’ components contain Chinese designed and manufactured parts within. Be careful when researching that you do not accept as ‘fact’ repeated declarations that are sometimes little more than opinion. Nor should you accept as gospel what is said in the ‘review’ sections on the vender websites.
Many sellers offer photovoltaic ‘kits’ for sale, both in different configurations and applications. While these are helpful when examined closely in order to see which components are being used where, the dirty little secret in the business is that often major components are missing from the ‘kits’. One site entices you with a low price only to discover no batteries or battery cables are included.
Often interconnecting cabling, disconnect and transfer switches or other code required components are missing from the low price. While I understand these areas depend upon the specific application, most people will not understand this is the case until well into the purchase process. To be fair kits rarely include solar panel mounting racks and hardware because of the wide variety of roof and pole mount systems. Keep this in mind when pricing a system. This site has the most complete kits I have found, but that doesn’t mean others website are not better.
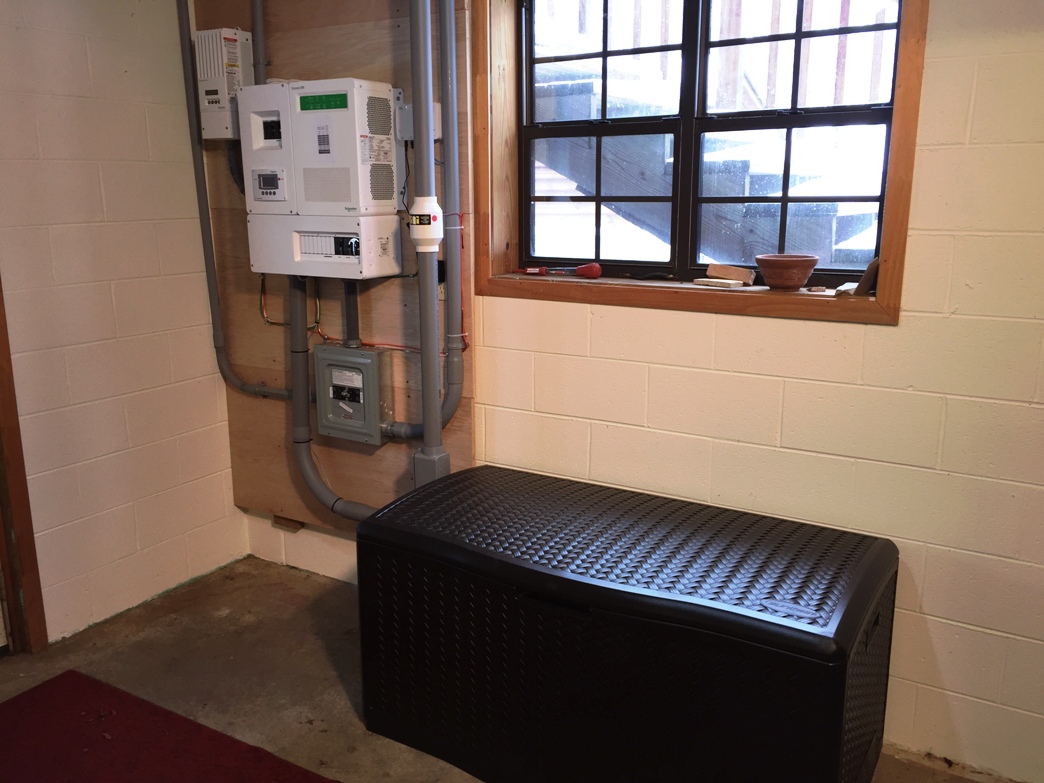 Control panel with battery bank inside brown 'deck box'.
All the vender websites encourage you to call their sales people with questions and to allow them to design a system for you. Just as long as you can resist the sales pressure I strongly urge you to do so if for no other reason than to examine what the sales ‘experts’ advise you to do in your particular situation. The true value gained here is to examine the customized systems offered between the venders as well as the differences. Be careful you are consistent with all of them when answering their questions, otherwise you will not be offered comparable systems.
This means you should do some research before calling so you at least know what you wish to power in your home and you have a modicum of understanding of the basic components and what they do. Don’t change specifications between phone calls to different venders. You can always repeat this process if you find the price is too high or less than you thought. The key is to compare similar ‘bids’ to see what is missing and what is included from offer to offer. This is a great source of information and a cheap education if conducted properly.
Something I find missing to some extent on the seller websites, and even to some degree on pure information sites, is the cost and technical challenge of connecting your midsized photovoltaic system to your house electrical system. Once again I suppose this is because of the tremendous variance in electrical systems in homes all across America, particularly if they were built more than 30 years ago. Still, much expense can float to the surface in just this area alone even if you have a modern home.
Unless you are installing a very small system (i.e.500 watts or less) which provides just one or two outlets with which you plug small items into, or you are dropping $30-40,000 into a whole house grid-tie or off grid system which makes the system tie-in relatively easy, trying to mesh a midsized photovoltaic system with an operating grid-powered home electrical system is no small matter and must be executed carefully and with much prior planning. This way be dragons if not carefully and competently navigated.
The only thing worse than ignorance is knowing just enough to get yourself into deep trouble, a condition I am quite familiar with since I am always hip deep in doo-doo. Just because you are familiar with some aspects of AC (standard house) wiring, maybe because you wired up an electrical sub-panel in the basement or changed out a circuit breaker or defective outlet, doesn’t mean you know the ins and outs of DC or how to interconnect DC and AC. The same holds true for professional electricians. While they must demonstrate a working knowledge of DC before being licensed by the state, in practice most residential electricians have very little experience with DC and particularly with DC-AC photovoltaic power systems.
If you do not wish to install this baby yourself I strongly urge you to hire someone who works in this field exclusively to do the work for you. Paying the local electrician for his on-the-job training is not the best solution and it still doesn’t mean the job will be up to code, an unpleasant situation you might only discover when it breaks or you try to sell your home and the buyer’s home inspector tells you the bad news.
Finally I offer a warning to the wise. While I am not trying to discourage you from doing it yourself, other than a small system designed to provide one or two built-in outlets with which to power a few plug-in items, anything hardwired into your house electrical system should not be attempted unless you know what you’re doing or are willing to learn. Just because it is Direct Current doesn’t mean it can’t, or won’t, kill you. My relatively small battery bank produces enough power to melt a crescent wrench if dropped across the battery terminals. This is quite a bit different from the tingle received when placing a 9 volt battery on your tongue. I threatened my daughter’s new boyfriend with electrical torture if he crossed the line with her, and I’m fully capable of backing up that threat. J
The point is basic; if you are not willing to educate yourself beyond the bare minimum you really shouldn’t be installing the equipment. Hurt ego aside, serious harm can come to you and your loved ones via an improperly installed and maintained photovoltaic system. Particularly with preconfigured ‘kits’, the assumption by the manufacturer and seller is that you know what you’re doing and you know what questions to ask. As mama always said, to assume anything can make an ass out of you and me.
Please check back regularly for additional chapters as I continue to write about the good, the bad and the ugly of our photovoltaic solar system. If you would like to read other articles about our homestead and the various projects we have completed over the last two years, please click here.
02-25-2015
Cognitive Dissonance
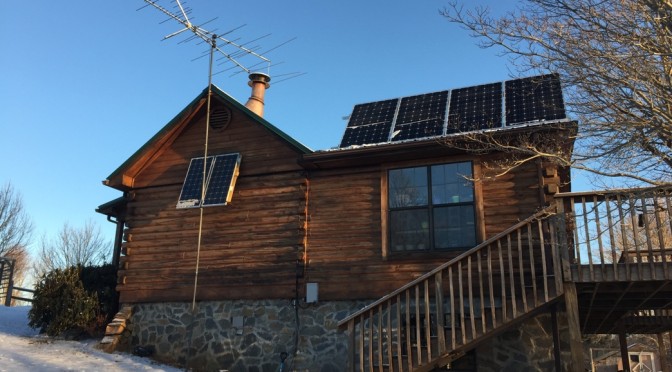
The solar array in the late afternoon winter sun.