From Mrs. Cog's Corner
After recently receiving several emails asking me about pressure canning I decided to document my process for “putting up” a year of chunky homemade chili to show how it can be done. While everyone has their own preferences in equipment, ingredients and seasoning, there are some basic safety rules to follow. Once you understand them, recipes can be modified to suit your taste and needs, then you will be off on your own adventure of creating home cooked “fast food” from ingredients you select or grow yourself.
Pressure canning differs from water bath canning in that with pressure canning you can preserve meats and vegetables. Water bath canning only brings the jars to a sea level boiling temperature of 212°F, which works fine to eliminate food borne pathogens in acidic foods such as sweet fruit jams, pickles or salsa made acidic with vinegar. But low acid foods such as meats and vegetables must be processed at a higher temperature, which cannot be achieved at home unless we put the cooking container under pressure to process the jars at 240°F to 250°F for 25 to 100 minutes depending upon the contents and jar size.
A good pressure canner will last a lifetime. I own a Presto 23 quart which will process 7 quart jars or 20 pint jars or 24 half-pint jars at a time. Using a large pressure canner/cooker is important because it takes much longer to process the jars with this method than with water bath canning, thus processing more jars at a time is essential if you don't wish to spend days in the kitchen. I recommend getting an extra rack to utilize the maximum capacity of the pressure cooker vessel by stacking the jars in two layers, one on top of the other. Also, purchase an extra gasket called a sealing ring, which is the only part of the canner that wears out. The canning bloggers recommend replacing it every 3 years or so.
I make very thick and chunky chili. The amount and type of ingredients varies because I am often using what I grow or find fresh at the local farmers market. I prepare my chili in large quantities as if I were going to serve a small army, but then I pressure can it to preserve it. In other words, you can add, subtract or substitute ingredients to your liking or convenience to create your own perfect chili, or just to preserve what is growing best in your garden.
For this week’s batch of chili I used dozens of fresh ripe tomatoes, sweet onions, green peppers, fresh corn, dried kidney beans, fresh black beans, organic minced garlic and 5 pounds of 96% lean ground sirloin (in lieu of “hamburger meat”) as my primary ingredients. The night prior to the Chili Fest I shucked the corn for removal from the cob and blanching the next morning, defrosted the meat I bought and froze the week before and put the 2 pounds of dried kidney beans in a big bowl of water to soak overnight. Soaking them for 8+ hours removes 95% of the starches that cause gas when eaten, a Cog approved extra step.
This was the largest batch of chili I've attempted to date, so I cleared an entire day from 5am until midnight. My goal was to put up a year's worth of chili, approximately 4 gallons of homemade canned chili made primarily from fresh local ingredients.
With chili morning finally here, and my morning reading, website maintenance and second coffee finished, I dove in around 8 am. I already had the 60+ green peppers that were picked, halved, blanched and frozen over the past few weeks defrosting. A pound of black beans had found its way into a big bowl of clean water to rehydrate. The bowl I chose for these black beans turned out to be too small and about an hour later the now bulging beans were overflowing as they rapidly expanded like popped popcorn, tossing a few across the counter every few minutes lol. Cog found that most amusing.
By 9am, I had peeled about 100 ripe tomatoes from the garden. The varieties included Rutgers, Beefsteak and Roma. Although the process was time consuming, they were easy to peel. As I stacked the tomatoes near the stove I cut out the top, putting the unused portion into the Junk bowl. I then cut an “X” in the top and dropped them two at a time into boiling water. After boiling for 20-40 seconds depending upon the size, I retrieved each with a slotted spoon and plopped them into a big bowl of very cold water.
Then, one at a time I took them out of the cold water and while applying some pressure with my finger tips the whole skin slid right off. This was then added to the junk bowl. I then diced each tomato, examining each for imperfections and removing most of the seeds before adding them to a separate bowl destined for the chili. This yielded about 9 quarts of juicy, fresh diced tomatoes.
By 10:15 the dozen ears of sweet white corn bought the prior day at the farmers market were then washed, blanched and the kernels cut off the cob, a messy endeavor indeed. All kitchen rugs were taken outside to avoid collateral damage.
Around 11am I commented to Cog that the corn was good, but not as sweet as I had expected. I saw the light bulb go off over his head as he headed out the door, quickly returning with the first five ears of corn from our corn patch in the garden. We took a break and had an early lunch of very sweet fresh corn on the cob.
By 11:45 all the corn was sliced off the cobs and the green peppers diced. At this point I gathered up two very large soup kettles and divided the tomatoes, corn and green peppers evenly between them. Last year's experimental canning taught me there would not be enough room to fit everything in one kettle, so it is better to divide the ingredients evenly among the two large kettles from the beginning.
During the 12 o’clock hour I browned 2 ½ pounds of ground sirloin in a skillet while adding dark chili powder and nutmeg to it. When finished, I dumped it all in a kettle and repeated the process with the remaining ground beef for the second kettle. By this point they were both more than half full. I drained and rinsed both the kidney beans and the black beans, now fully expanded after soaking. I divided them evenly into the two kettles.
By 1:30 I had sliced and diced 15 large onions and had a good cry while doing so. At this point my shoulders and arms were aching from all the chili-tations. Cog took pity on me and stirred up some trouble along with the spices and three cans of tomato paste he added to each kettle.
He even showed me a neat trick to quickly extract the tomato paste from the cans. Simply remove one top of the can, then flip it over and begin removing the other top. The tomato paste quickly slides out . As he continued to stir I added salt, pepper, cumin, more dark chili powder and red cayenne pepper along with several cups of water since the mixture had thickened considerably. Finally it was ready to be processed.
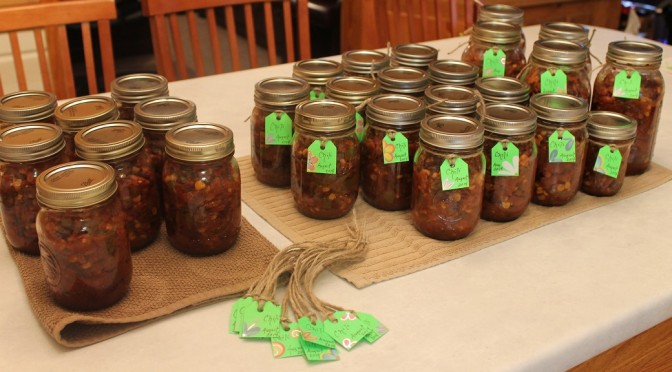
Note that everything was cooked or blanched except the beans, which had been soaked/rehydrated. The beans cook perfectly while processing in the canner. Jars were prepared and filled, leaving a generous inch of space at the top of each to allow room for the contents to expand. They were loaded into the canner just after 2:30.
The pressure soon reached the desired reading (at 3,000 ft. altitude) of 13lbs. per square inch (PSI) at 3:30 and I started the timer for 90 minutes since this batch was loaded into quart jars. At 5pm the heat was turned off and by 6pm I unloaded the canner. I reloaded it around 6:30, this time stacking 9 pint jars on a rack atop 9 more for a total of 18 pints in all. Pints jars are processed for 75 minutes once the magic 13lbs. of pressure is reached. The final 8 pints went into the fridge to wait for the following morning because I was just physically beat and plum out of time. At 8am the next morning, into the canner went the third and final batch.
This batch of chili was incredibly thick and I could have easily added some additional water either before processing or later on when the jar is opened to eat. We often heat the chili up and pour it over a bed of lettuce for a home made baja salad, in a bowl like a stew or on crispy taco shells with all the fixins’. It can also be served over rice. I enjoy heating up a big spoonful or two and dolloping sour cream on a plate next to it to dip tortilla chips into as a snack. Spices can be added after opening to add a kick with cayenne, jalapenos or crushed red pepper.
Keep in mind that pressure canning will give you the ability to preserve the meats and vegetables in your freezer in the event of a long term power outage, provided you have a short term backup source of heat such as a canning hot plate (you will need a large and powerful commercial version) that can be powered by a generator or an outdoor stove that can accommodate a canner.
Having the ability to preserve vegetables, meat and recipes in a pressure canner affords you the freedom you wouldn't otherwise have. Sourcing the ingredients for your meals, choosing nutritious and tasty dishes and knowing it will store for years in your pantry is a gift that makes all the work that goes into it more than worth the time and initial cost. My two cents… bon appétit!