Taking a Pass on Gas – Wood Preferred - Part 2
By
High Desert Homesteading
Part 1 of this article (link) covered the 3 D’s (Discovery, Disappointment and Demolition) of our project to replace a gas fireplace with a wood burning stove. Now it’s time for the 3 R’s: Redesign, Rebuild and Relaxation.
I ended the previous installment with a hearth half covered in flagstone, bare studs on the exterior wall and part of the ceiling exposed right down to the ceiling joists and insulation. My wife and I threw around a lot of ideas as to how we might rebuild this area with the least amount of effort but would still look good. The end of Part 1 contained an image mock-up I composed of several different pictures showing the final idea.
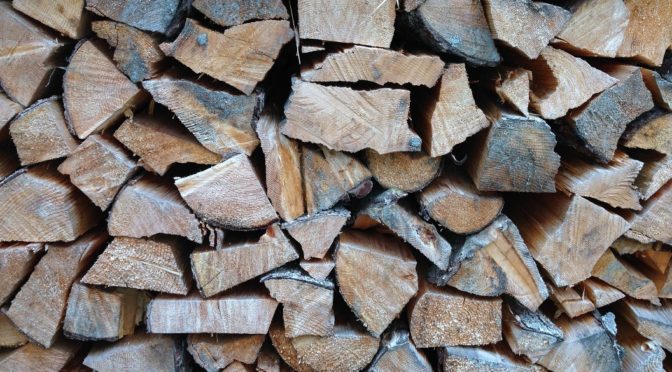
Our last home had several large walls finished in stained knotty pine, a look and style we liked a lot. We wanted some sort of stone work behind the wood stove to act as a thermal mass to absorb some of the heat coming off the stove while protecting the woods studs and Sheetrock behind. I most certainly did not want to try and patch the 2’ x 8’ area of the ceiling with drywall and then attempt to match the texture and paint color. You would think an eggshell white is an eggshell white – until you try to match it and find out otherwise.
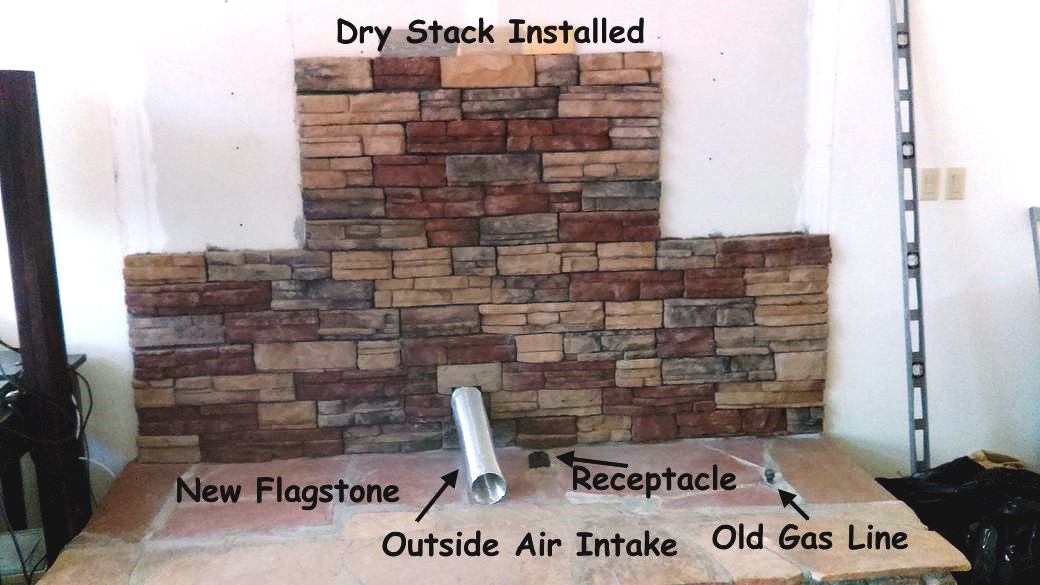
What I knew was the first step was to install the vent for the “outside air intake.” Until relatively recently, to replace the fresh air consumed by a fireplace or wood stove one simply opened an adjacent window. This never seemed logical to me because you were literally sucking freezing air into the area you are trying to warm.
In an older cabin we once owned, I went so far as to cut a large rectangular hole near the floor between two studs of an interior wall next to the fireplace. I covered the opening with a standard cold air return vent cover. In the attic (which was vented to the outside air, as most are) I cut out the header (the horizontal 2x4’s attached to the top of the two vertical studs) and built a rectangular box with a hinged lid.
I attached the lid to a small rope via a pulley and dropped the rope through the ceiling right down the wall. I then added a decorative pull and hook. When we had a fire going, all I had to do was pull the rope down about 4” and attach it to the hook. This would open the attic box lid, thereby providing ample fresh air right next to the fireplace rather than drawing cold air all the way across the room via the open window.
Since the last time I purchased a new wood stove/fireplace, manufacturers have widely adopted this idea. Most new models have the option of an outside air intake with an adapter designed to grab fresh air from a previously installed outside vent and feed it directly into the firebox. Since I was starting with bare studs on an exterior wall, installing an outside air intake was a no-brainer.
However, the vent installation was not as easy as it could have been. In most situations, you would go straight out the wall with a small segment of 4-6” vent pipe (the diameter varies per fireplace or stove). In our case, the main living area is actually on the second floor (the “first” floor being a partially finished walk-out basement) with an attached garage roof butting into the exterior wall some 40” above the interior floor line.
If I went straight out at floor level with the vent pipe I would actually be drawing combustion air from the garage and not directly outside. I needed to find a way for the fresh air pipe to exit the wall above the roof of the garage, meaning at least five feet above the living room floor, while keeping the pipe inside the wall and out of sight.
Think periscope and you get the idea.
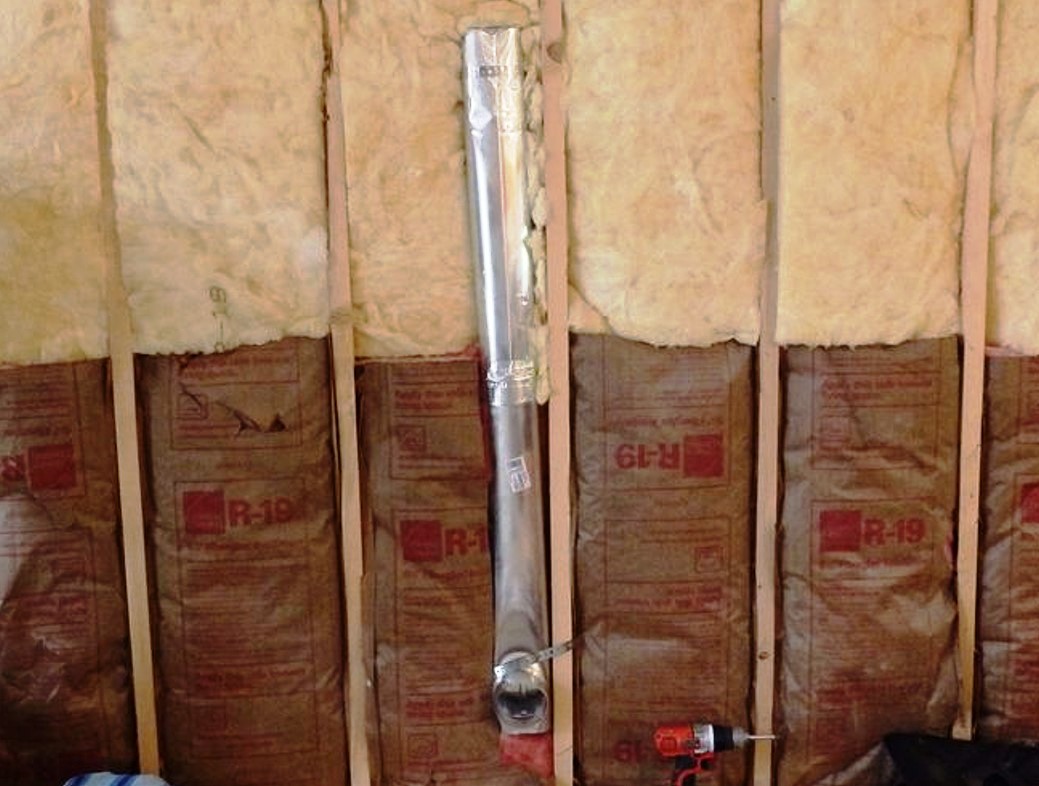
My first thought was to use HVAC vent pipe with elbows. The problem was that even with 2x6 exterior wall studs, there simply wasn’t enough room between the exterior sheathing and interior drywall to fit the elbows. For some reason my mind catalogs items I see that uniquely solve a wide array of problems. While searching (and searching) the internet looking for a solution, I recalled a device that enabled builders to place clothes dryers much closer to the back wall than normal. A telescoping air exhaust vent elbow had been designed for this application. Basically it consists of two sections of oval 3”x5” pipe telescoped together, each having a standard 4” round vent attached to the end.
The photo below was placed at the end of Part 1 of this article as a teaser to this next segment. It shows the “periscope vent” in place. The round vent exiting to the outside at the top (not shown) was covered with a rodent/insect/weather proof vent cover to keep the undesirables out while still allowing the free flow of air in. A flexible metal hose will be attached between the inside round vent and the adapter on the stove.
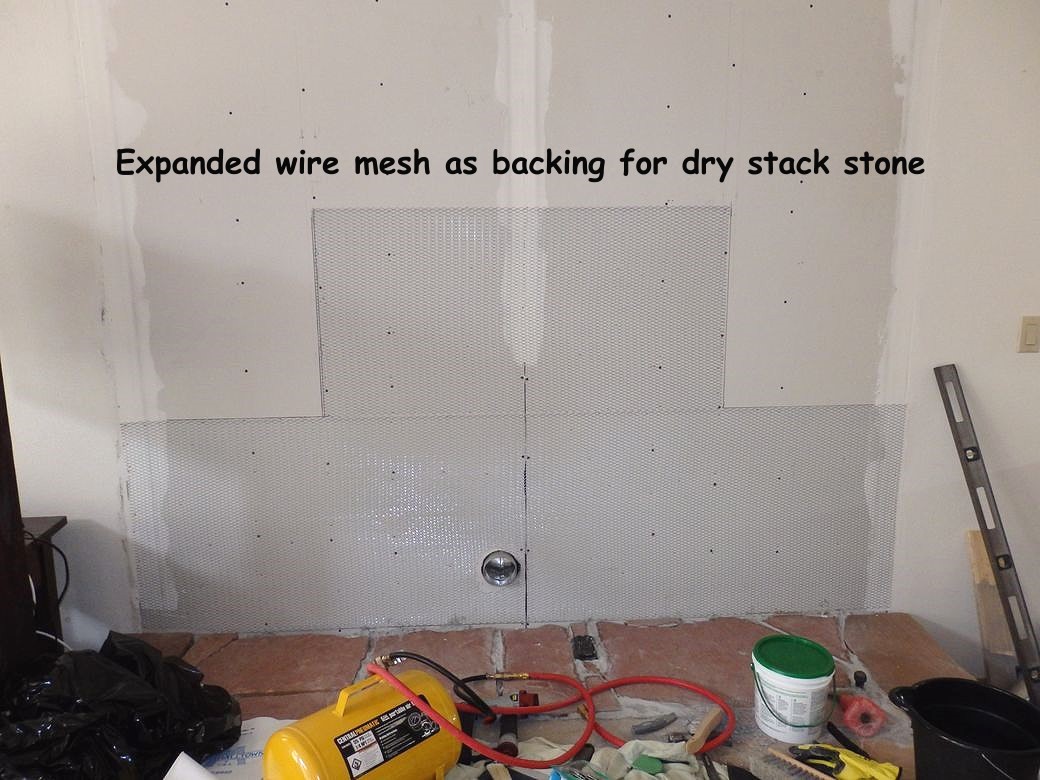
Once the vent was in place, drywall was installed to patch both the wall and ceiling areas. I thought I would need to use cement board where the cultured decorative stone would go to provide sturdy wall support for the “stone”, but the manufacturer indicated it was not necessary on an interior installation.
In light of how difficult it was to install the outside air vent, I decided to fully evaluate everything else that needed to be done before going any further. This project requires a bit of electrical, plumbing and wood working – all of which I have experience doing. However, it also requires a fair amount of masonry work and, if I didn’t completely cover the open areas with stone or wood, a lot of drywall finishing.
I have wired entire houses for electricity except the main hook-up from the pole. I have plumbed houses, both for new construction and during remodeling. I have done everything from rough framing to fine cabinet building. But my masonry and drywall skills are mediocre at best, especially the drywall finishing aspects. That is why we decided on a rebuild design that included covering all the non-stone areas with knotty pine – even the 2’x8’ section of the ceiling.
Please indulge me as I reveal a bit of back-story here. Finding myself homeless at the age of 16 (a minor disagreement with my father about returning to high school) I received an involuntary crash-course on the subject of the “selves”: self-preservation, self-reliance and self-sufficiency. Hence I acquired a variety of self-taught skills. Unfortunately, Newton’s Law of opposite reactions reared its ugly head and cost me other “selves”: self-esteem, self-worth, and self-acceptance. To this day I’m not sure which end of the stick I received. Meaning while I’m a jack of all trades and master of none, there are a few glaring gaps in-between.
Immediate tasks included finding matching flagstone for the hearth (how hard can that be?) and locating the right type of cultured stone that would complement the flagstone, stained knotty pine and several different wall colors. Plus planning out the new chimney and getting those parts on hand. Most importantly, I needed to spool up YouTube for some in-depth lessons on cutting flagstone and installing cultured stone.
Finding the cultured (meaning man-made) dry stack stone required a trip to a local manufacturer. Local in our neck of the woods means over an hour’s drive one way. The field trip was necessary because the manufacturer had numerous types of stone designs, each available in dozens of color schemes. Having found one we considered “perfect”, we placed an order and moved on to find the needed flagstone at a large landscaping/rock/stone company.
The first landscaping company had a vast array of choices in flagstone. Had we been starting from scratch, we would have been good to go. However, we were trying to match the flagstone that still covered half the hearth. This task proved harder than we initially figured. The selection of flagstone this company had which was close in color was way too thick and therefore unusable. We weren’t worried though, for we knew there was another company down the road a bit.
Unfortunately we had no luck there either. They had nothing even close in color. Not wishing to turn this day trip into an over-nighter in order to visit additional suppliers…and since the new flagstone would either be behind the wood stove or under the wood racks, we settled on a standard red color of appropriate thickness.
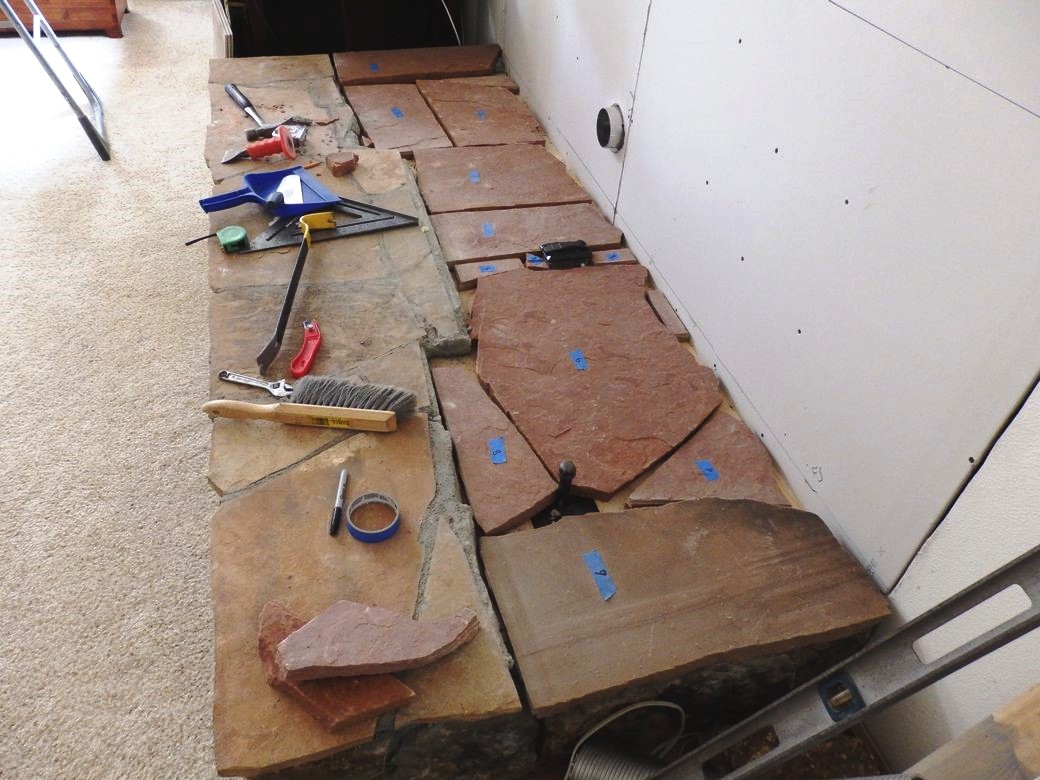
Installing flagstone (or any stone for that matter) is more of an art than a science. It’s sort of like a jig saw puzzle, except none of the pieces are an exact fit. One must first lay out all the pieces, some on top of others, to find the best fit and then mark where cuts are required. Sometimes multiple cuts are needed to make a single piece fit properly. Cutting flagstone is a loud, dusty job – so all the pieces were moved back outside for cutting.
YouTube has multiple videos showing how to cut flagstone. But the method I found to be the most accurate and fastest was to use a masonry blade in my circular saw to score the stone along the marks, then pound a cold chisel on the opposite side until enough micro-fractures were created to break the stone along the score line (more or less). I quickly discovered close applies to horseshoes, hand grenades and flagstones.
The photo below shows the flagstone all laid out (aka dry fitted) after cutting. I had previously numbered each piece during the initial layout process so I could successfully reassemble the puzzle once everything was cut. Failure to number the stones before cutting would have been a near fatal error.
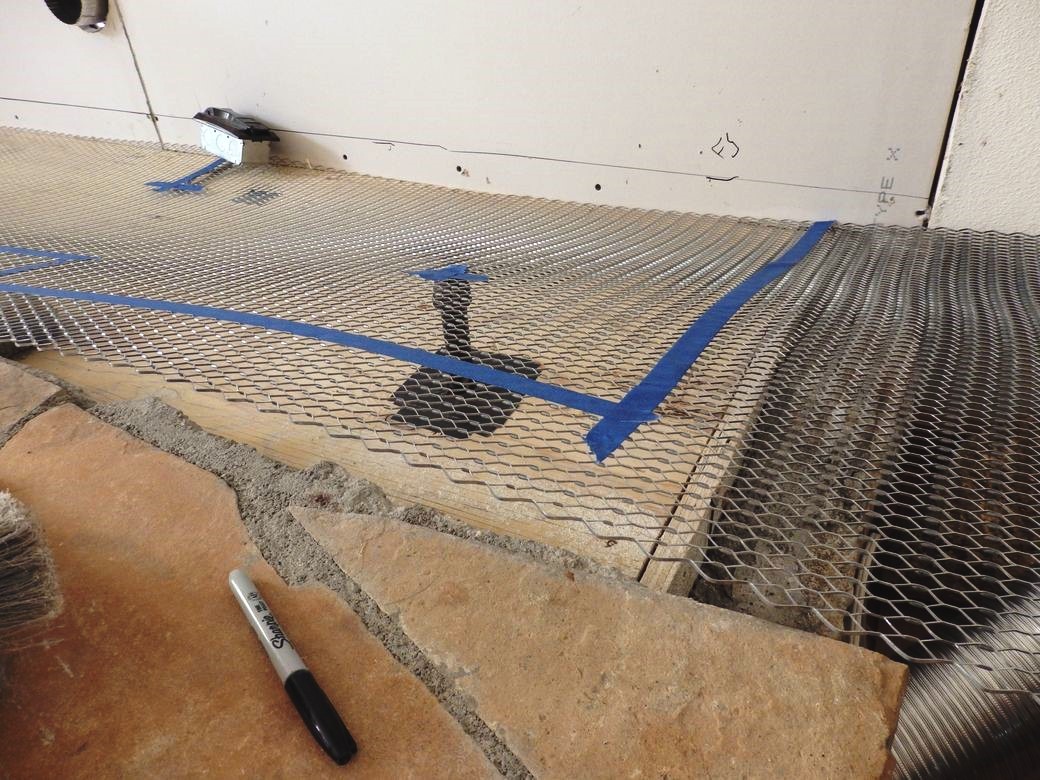
Although not installed by the original builder, I decided to integrate the new flagstone properly using expanded metal mesh, also known as diamond mesh or stucco lathe. The same mesh would also be used on the wall before placement of the cultured stone. After marking for size and cutouts, I used a 4.5” angle grinder with a metal cut-off blade to cut the mesh to fit. Gloves are mandatory when working with this stuff because the ends are like razor blades. It only took a few minutes to mount the mesh using my pneumatic staple gun.
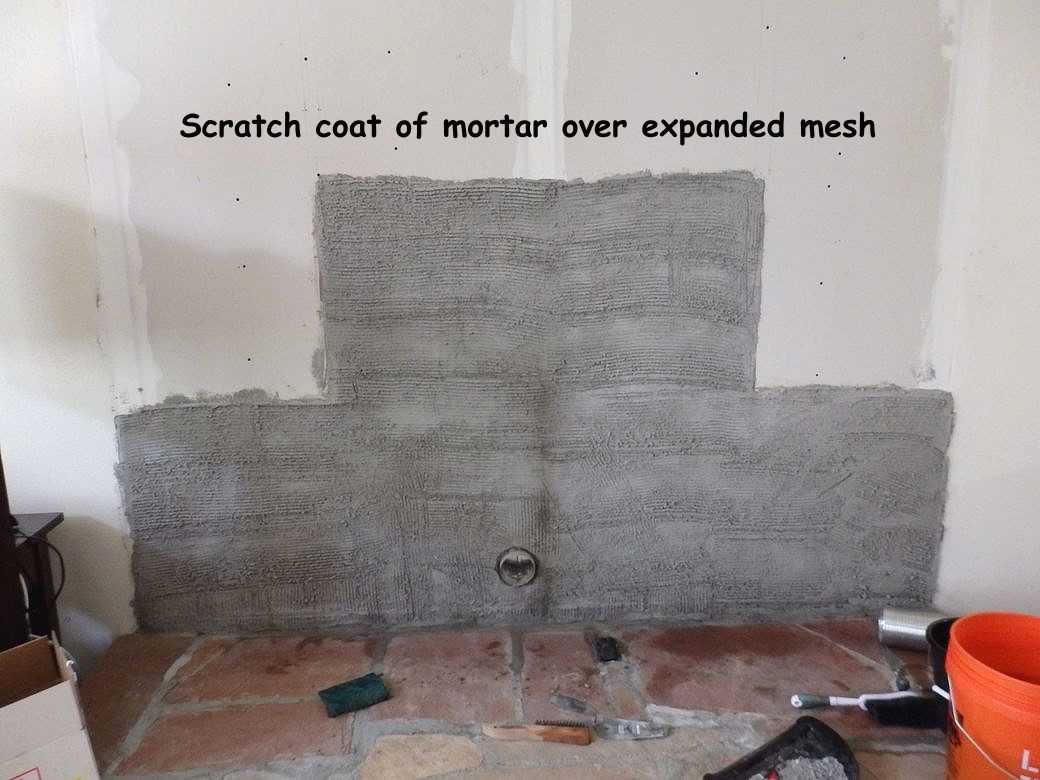
The next step involved hauling several 80lb bags of mortar mix up the stairs to be mixed on the deck in a large mixing pan (one bag at a time) then dragging both mixing pan and mortar inside and up onto the hearth.
The masonry work needed to be completed in two phases. The first involved applying a thin scratch coat of mortar on the back wall and a thicker layer on the hearth to set the new flagstone. Putting weight on the newly placed flagstone in order to install the dry stack stone on the back wall would have to wait 24-48 hours for the flagstone to first properly set up.
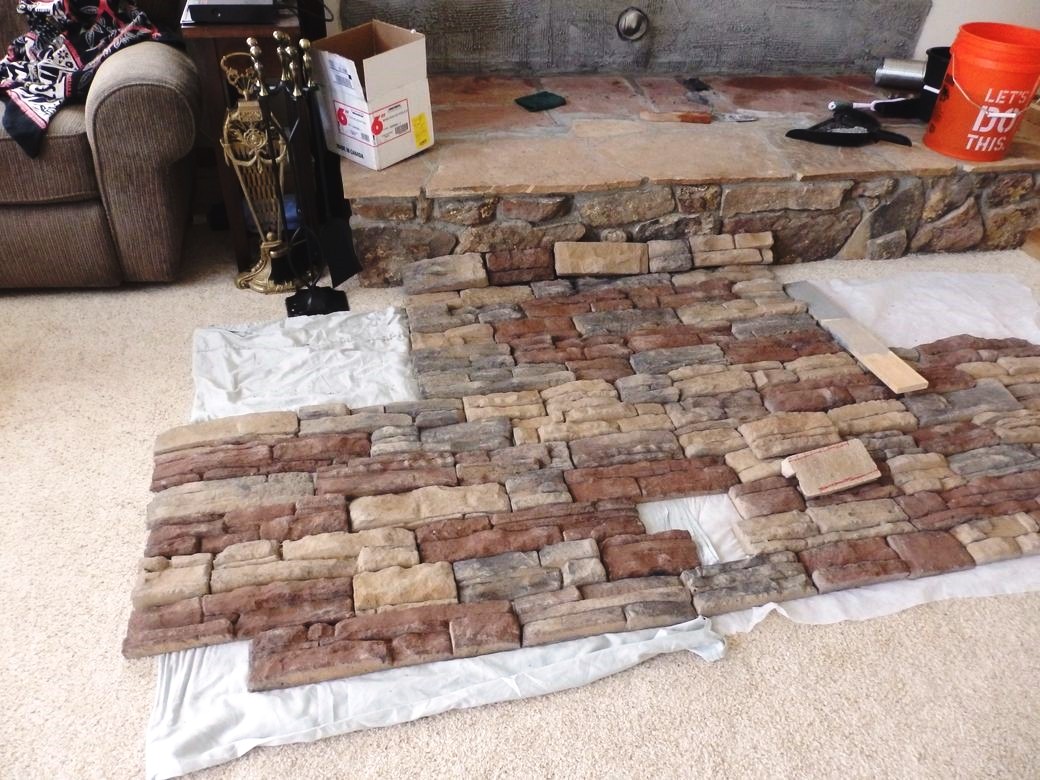
The dry stack cultured stone is actually a special concrete poured into a mold with the “stone” side painted or dyed after removal. It’s amazing how real this stuff looks. The individual pieces were all approximately 4” tall/thick with a fair amount a variance. However, they ranged in width from a few inches to 18”. Additionally, each stone had a predominate color with 4-5 different minor colors mixed into the color scheme.
Since we needed each row of stone to end at the same point, and we didn’t want too many of the same color stones bunched together, this necessitated laying out the entire pattern on the floor and playing more puzzle games. No wonder the supplier recommended buying 10-15% extra.
We had to make sure each row was the appropriate length, that colors weren’t bunched up and that the vertical seams of the next row didn’t match with the row below. This took longer than you would think. But after a few hours of mix and match it was time to mix up more mortar and begin transferring each row to the back wall.
Using a 6’ level, as the rows took shape we quickly realized that the variance in the thickness of the individual stones was going to be a problem. It all looked good laid out on the carpet, but once on the wall it was extremely difficult to make an 8’ long row level while trying to compensate for variation in stone sizes and shapes. In carpentry, there is an old saying when woodwork doesn’t line up or come together very well – “that’s why they invented trim.” I guess a mason’s trim is mortar.
Part 3 of this article will cover the final stages of installing the new chimney stack, the knotty pine woodwork, and (finally) getting the 450lb stove up on the hearth, hooked up and ready to burn.
High Desert Homesteading
